
Looking for a breezy, beautiful summer skirt you can sew yourself, even if you’re a beginner?
This three-tiered maxi skirt with pockets is a perfect project!
It’s made from soft musselin fabric, features hidden side pockets, a non-bulky waistband with a zipper (no elastic here!), and it’s flowy, comfortable, and flattering.
I’ve documented the full process in a step-by-step video tutorial on my YouTube channel, so you can follow along visually. In this blog post, I’ll guide you through all the steps, from cutting the fabric to finishing the hem.
✨ Want an elasticated version instead? I have other tutorials on my channel that show you how to add an elastic waistband—just mix and match the steps based on what you prefer.
✂️ Materials You’ll Need
- 2.5 meters of fabric (you may use less depending on your measurements)
- Invisible zipper (20–25 cm)
- Matching thread
- Sewing machine
- Fabric scissors or rotary cutter
- Pins or clips
- Measuring tape
- Iron
- My free printable pocket pattern
Step 1: Plan and Cut the Fabric
First, decide how long you want your skirt. I’m 162 cm tall and made mine about 100 cm in length. The skirt is made up of 4 pieces:
- Waistband
- Tier 1
- Tier 2
- Tier 3
Each tier gets progressively wider for a full, flowing effect.
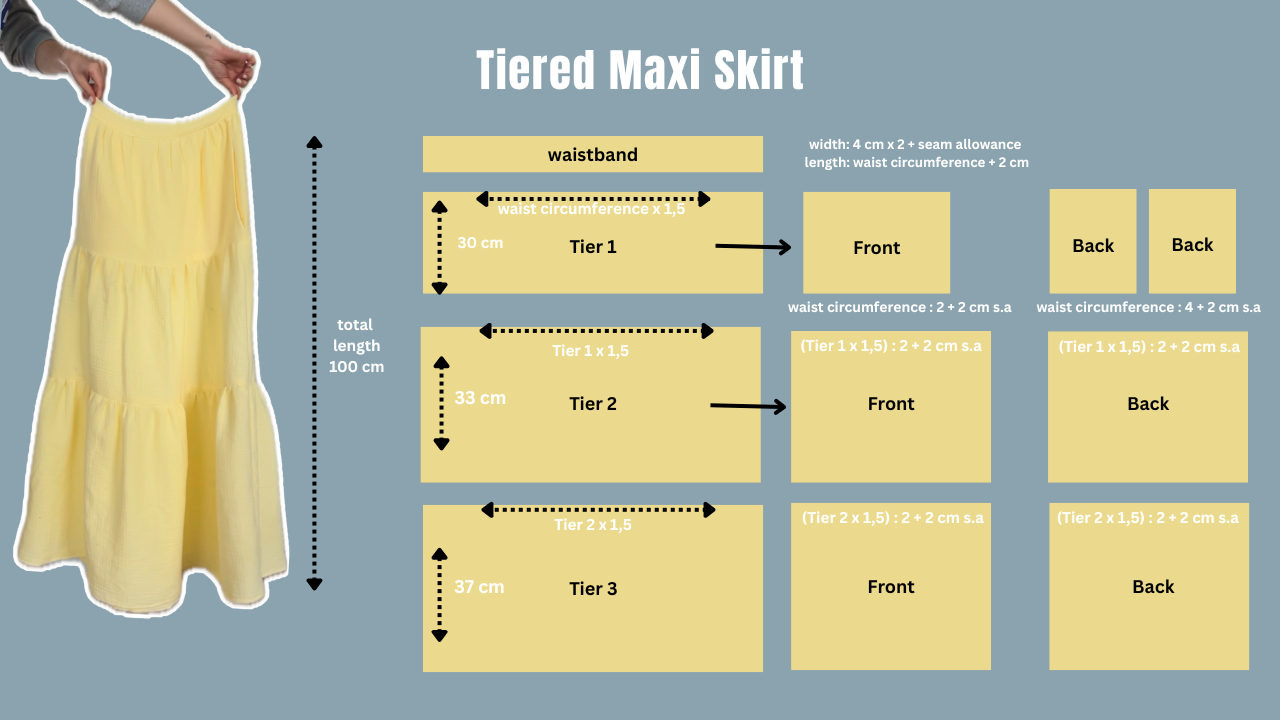
Step 2: Cut the Fabric According to the Diagram
Once you’ve calculated your dimensions, cut all your fabric pieces accordingly. Make sure to label or organize each piece clearly—especially the front, back, and pocket placements.
Here’s what I cut:
- 1 waistband
- Tier 1: 1 front, 2 back pieces
- Tier 2: 1 front, 1 back
- Tier 3: 2 full-width panels
- 4 pocket pieces (cut from the pattern, 2 mirrored pairs)
Step 3: Add the Pockets
I adapted a vintage sewing pattern to make the pockets—it’s available as a free printable on my blog. Download it here.
Cut 4 pocket pieces, making sure each pair mirrors the other.
Attaching the pockets:
- Measure 8 cm down from the top edge of each Tier 1 panel (front and both backs).
- Pin the pockets in place with right sides facing the fabric, the curved edge pointing inward.
- Sew each pocket to the skirt using a straight stitch along the curve, with a 1 cm seam allowance.
- Backstitch at the start and end of each seam for durability.
- Press the pockets open so they face outward.
- (Optional) Topstitch the pocket seam to keep them lying flat and facing the right way.
Step 4: Sew the Side Seams (Including Pockets)
- Place the front panel right sides together with the back pieces, aligning the side edges and pockets.
- Sew the side seam in one continuous line:
- Start at the top of the skirt.
- Sew down to the pocket opening.
- Sew around the outer curve of the pocket.
- Continue sewing straight to the hem.
- Remember to lift your presser foot (with needle down) at the pocket corners to pivot smoothly.
- Press the seams and pocket edges flat.
You now have clean side seams with functional, hidden pockets!
Step 5: Gather the Top Edge of Tier 1
- Set your machine to the longest straight stitch length.
- Sew a straight line across the top edge of Tier 1, about 0.5–1 cm from the raw edge.
- Do not backstitch, and leave long thread tails at both ends.
- Gently pull on the bobbin threads to gather the fabric until it matches the length of your waistband.
- Distribute the gathers evenly across the front and back sections.
Step 6: Prepare the Waistband
- Take your waistband piece (8 cm wide) and press both long edges inward by 1 cm.
- Then fold the waistband in half lengthwise, wrong sides together, and press again.
- You should now have a neatly folded strip that’s 4 cm wide, with no raw edges showing.
- Mark the center front and center back of both the waistband and gathered Tier 1 to help align them when sewing.
Step 7: Attach Waistband and Invisible Zipper
- Open up one edge of the waistband and pin it to the gathered top edge of Tier 1, right sides together.
- Sew it in place, making sure the gathers are evenly distributed.
- Insert your invisible zipper at the back between the two back pieces of Tier 1 and into the waistband.
- Fold the waistband over the seam, enclosing the raw edges, and stitch it down on the inside.
Now you’ve got a clean, non-bulky waistband with a secure zipper—perfect for keeping the waistline smooth!
Step 8: Gather and Attach the Remaining Tiers
For each tier:
- Sew a long straight stitch across the top edge of both front and back panels (just like Tier 1).
- Pull the threads to gather the fabric until it matches the width of the tier above.
- Pin and sew the gathered edge to the bottom of the previous tier.
- Press the seam flat.
- Repeat for Tier 2 and then Tier 3.
Step 9: Hem and Finish
- Fold the bottom raw edge of Tier 3 up twice by about 1 cm, press, and pin in place.
- Sew the hem using a straight stitch.
- Give your whole skirt a good final press with the iron, focusing on the waistband, seams, and hem.
You Did It!
You’ve now sewn a gorgeous, tiered maxi skirt with pockets and a non-bulky zipper waistband—all from scratch! Whether you’re heading to the beach, brunch, or just twirling around your living room, this skirt is a must-have for warm weather.
Watch the full step-by-step video tutorial on my YouTube channel here, and don’t forget to subscribe for more beginner-friendly sewing projects!
Prefer a stretchy waistband? I’ve got tutorials for that too! Just swap in an elastic band using my other method and combine it with this one.
More sewing projects here
